
OAuth 2.0 is the leading protocol used for authorization on the internet. Authorization means specifying the privileges of someone/something accessing a resource. Before we had standard protocols for authorization, we had to trust applications with our password to share private resources. Authorizing access to your Facebook friends involved giving the application your password and trust that the app would use it for only its said purposes, then get rid of it. Sharing passwords was an unfavorable procedure for both the user and the app. Cautious users would have to perform due diligence on new apps they were using, and apps in need of some private information had to build sufficient trust to gain those users. Today, this is a lot easier. With authorization protocols, modern apps let trusted third parties handle the requests, and, for the users, sharing resources is a lot less daunting.
With OAuth 2.0, when an app asks a user for access to a resource she owns, such as her contact list, the app redirects her to a third-party authorization server where she grants 'access to it. As the resource-owner, she has authorized the app IE. the client, to use her contact list. The authorization server mints and returns an access token, with the scope for her contact list, back to the client. Subsequently, the client includes the access token in its request to the resource server in order to retireve the contact list. I will, in this guide, explain several procedures software may use to retrieve the access token.
Warning: Authorization should not be confused with authentication, which is when you verify someone's identity.
They designed OAuth 2.0 for giving permissions, not for authentication. For authentication, you have OpenID Connect (OIDC), a small layer on top of OAuth 2.0. It provides a standardized way of getting user information through the OAuth 2.0 protocol. By asking for the openid scope when starting a session, you will receive an identity token in addition to the access token. The identity token is a JSON Web Token (JWT), valid for a set amount of time. Additionally, asking for the profile scope will populate the identity token with user information.
JSON Web Token (JWT) is a compact, URL-safe means of representing
claims to be transferred between two parties. The claims in a JW
are encoded as a JSON object that is used as the payload of a JSON
Web Signature (JWS) structure or as the plaintext of a JSON Web
Encryption (JWE) structure, enabling the claims to be digitally
signed or integrity protected with a Message Authentication Code
(MAC) and/or encrypted.
-- RFC7519
Client Credentials
A grant type is a method through which the client obtains the access token. The simplest grant type is Client Credentials and used in server to server communication. For the client to use the authorization server, the client must be registered by it and given a public client ID and possibly a private client secret that should only be known by the client and the authorization server. The ID and the secret are the client's credentials, which it can exchange for an access token using the authorization server's token endpoint. Which endpoints to use in communication with the authorization server can be found with the configuration URL. This information is usually available on the authorization server's dashboard, but the URL is the IETF standard to obtain information about interaction with authorization servers.
Note: Grant types are often referred to as flows.
Note: The shell I am using in this guide is Fish, but converting the commands to Bash or Zsh should not be complicated. Also, the commands are executed on a Mac
⋊> curl  --request GET \
         --url https://sober.eu.auth0.com/.well-known/openid-configuration \
         | jq
{
  "issuer": "https://sober.eu.auth0.com/",
  "authorization_endpoint": "https://sober.eu.auth0.com/authorize",
  "token_endpoint": "https://sober.eu.auth0.com/oauth/token",
  ...
}
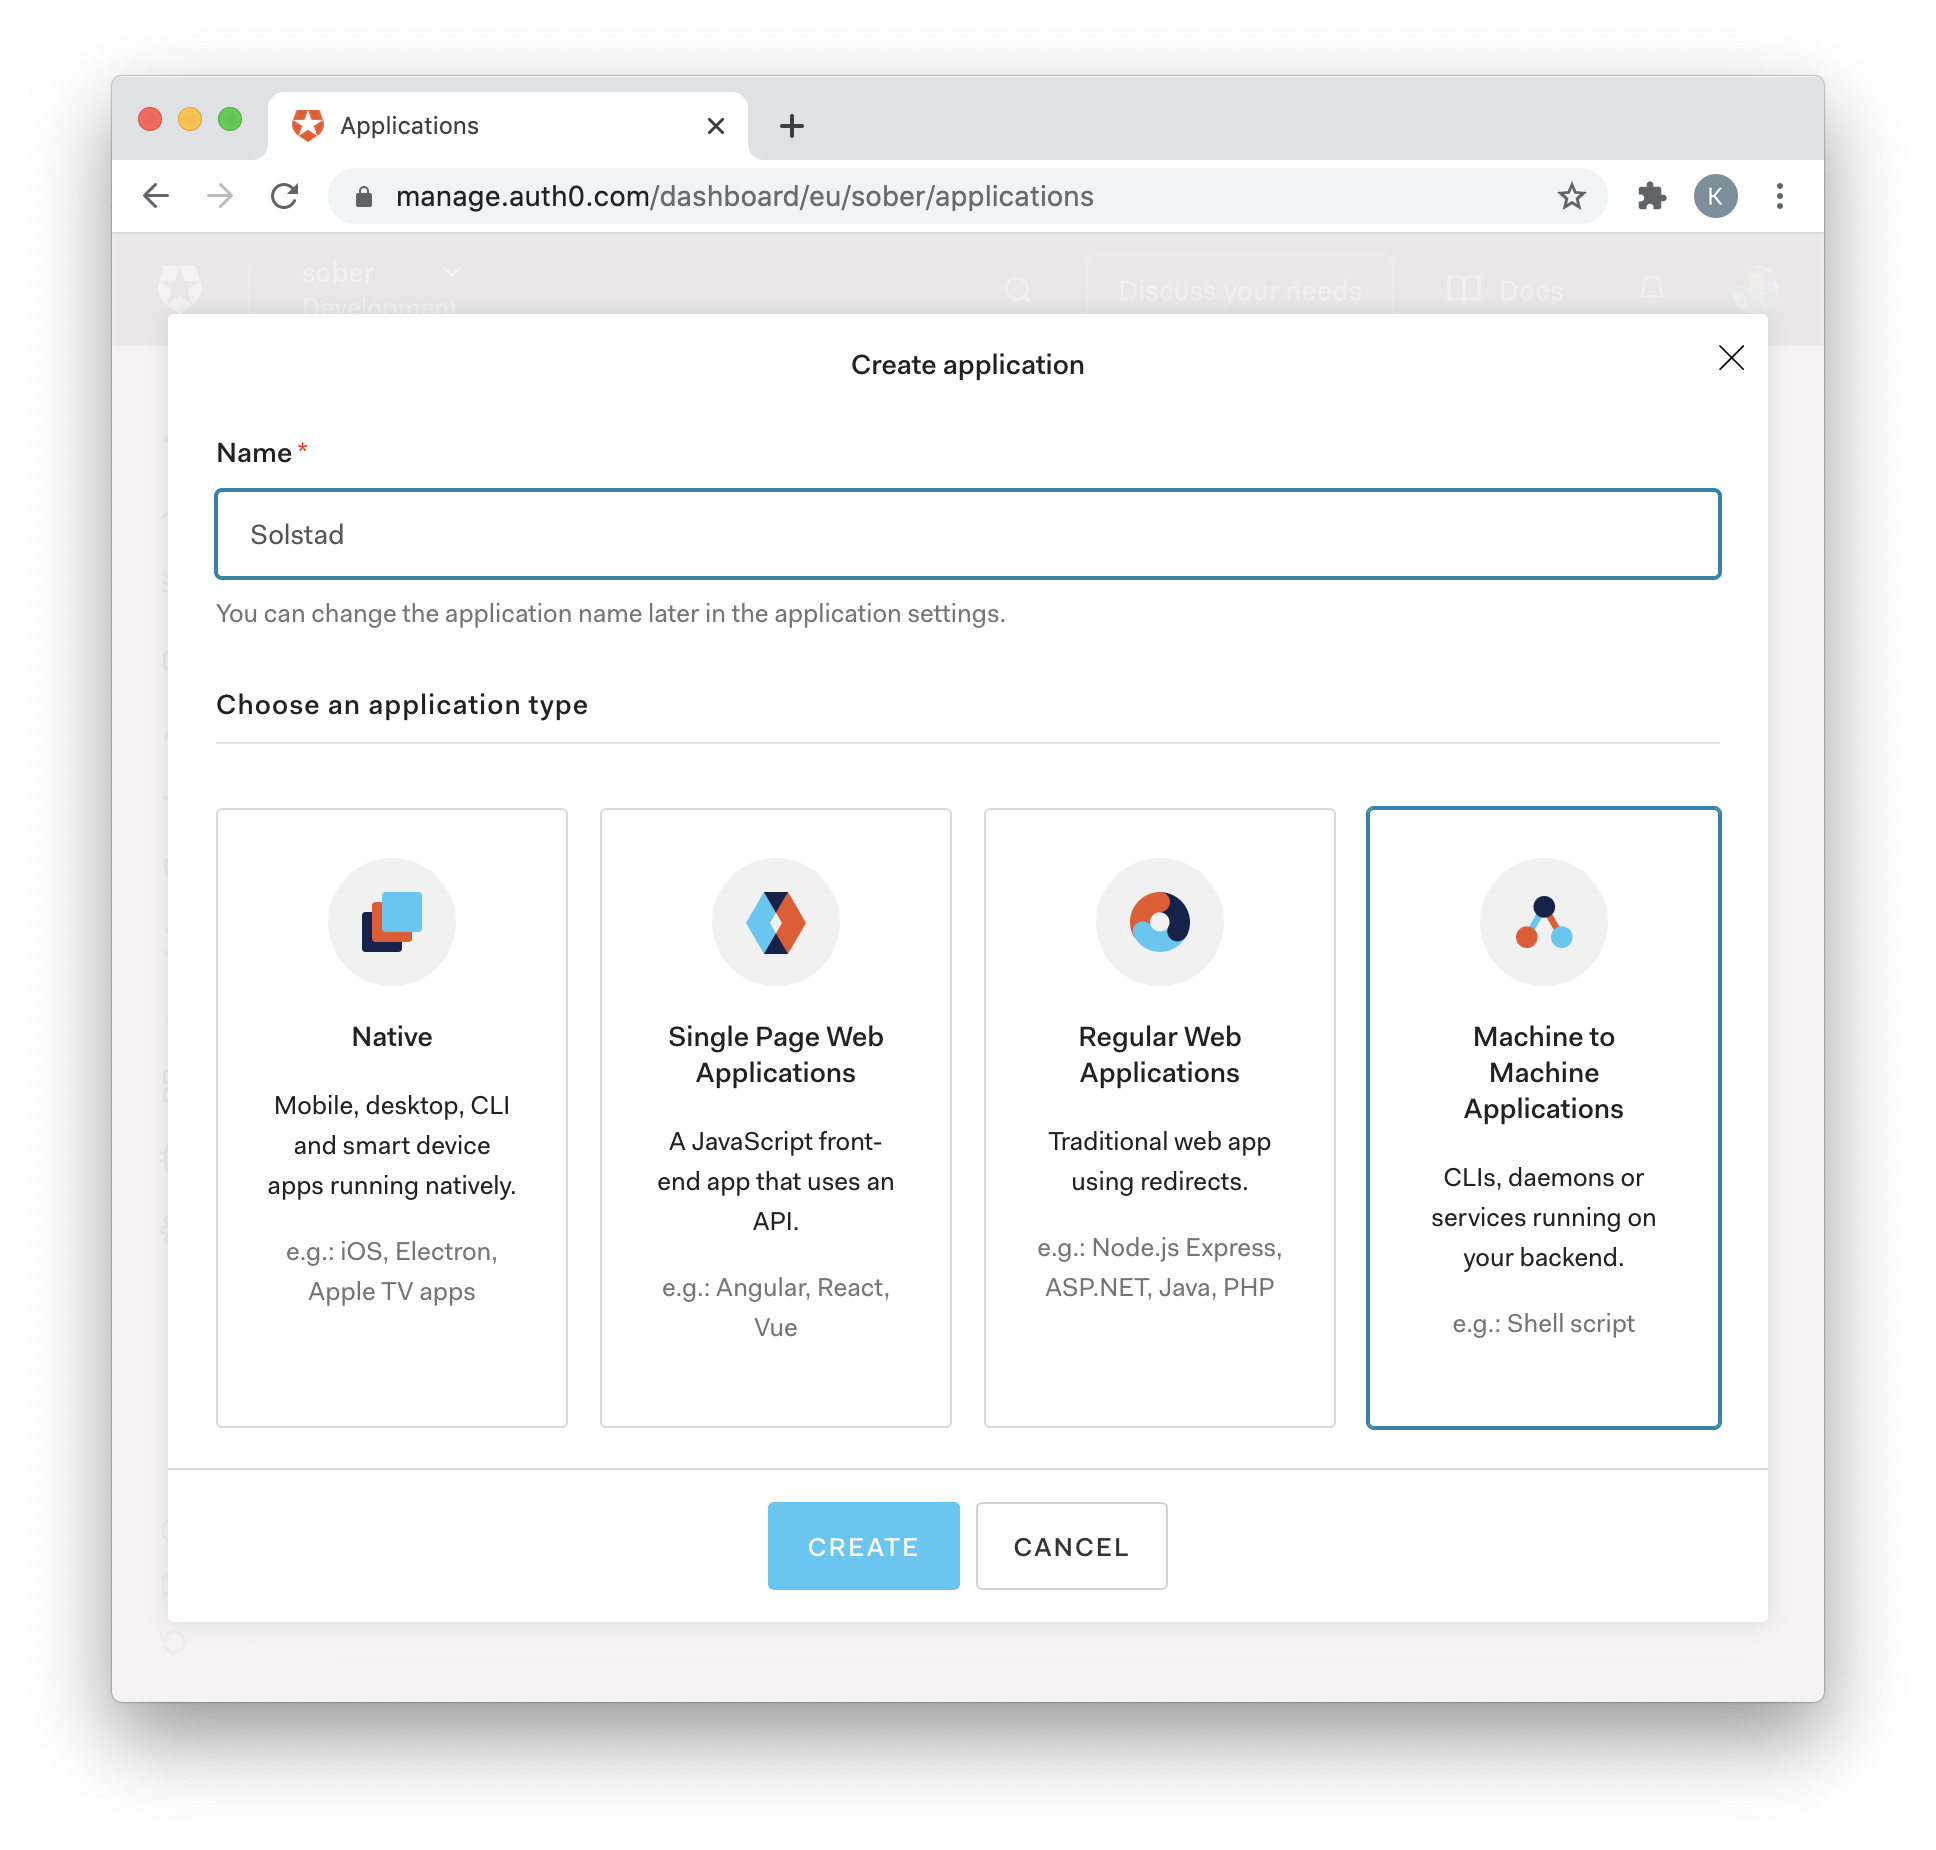
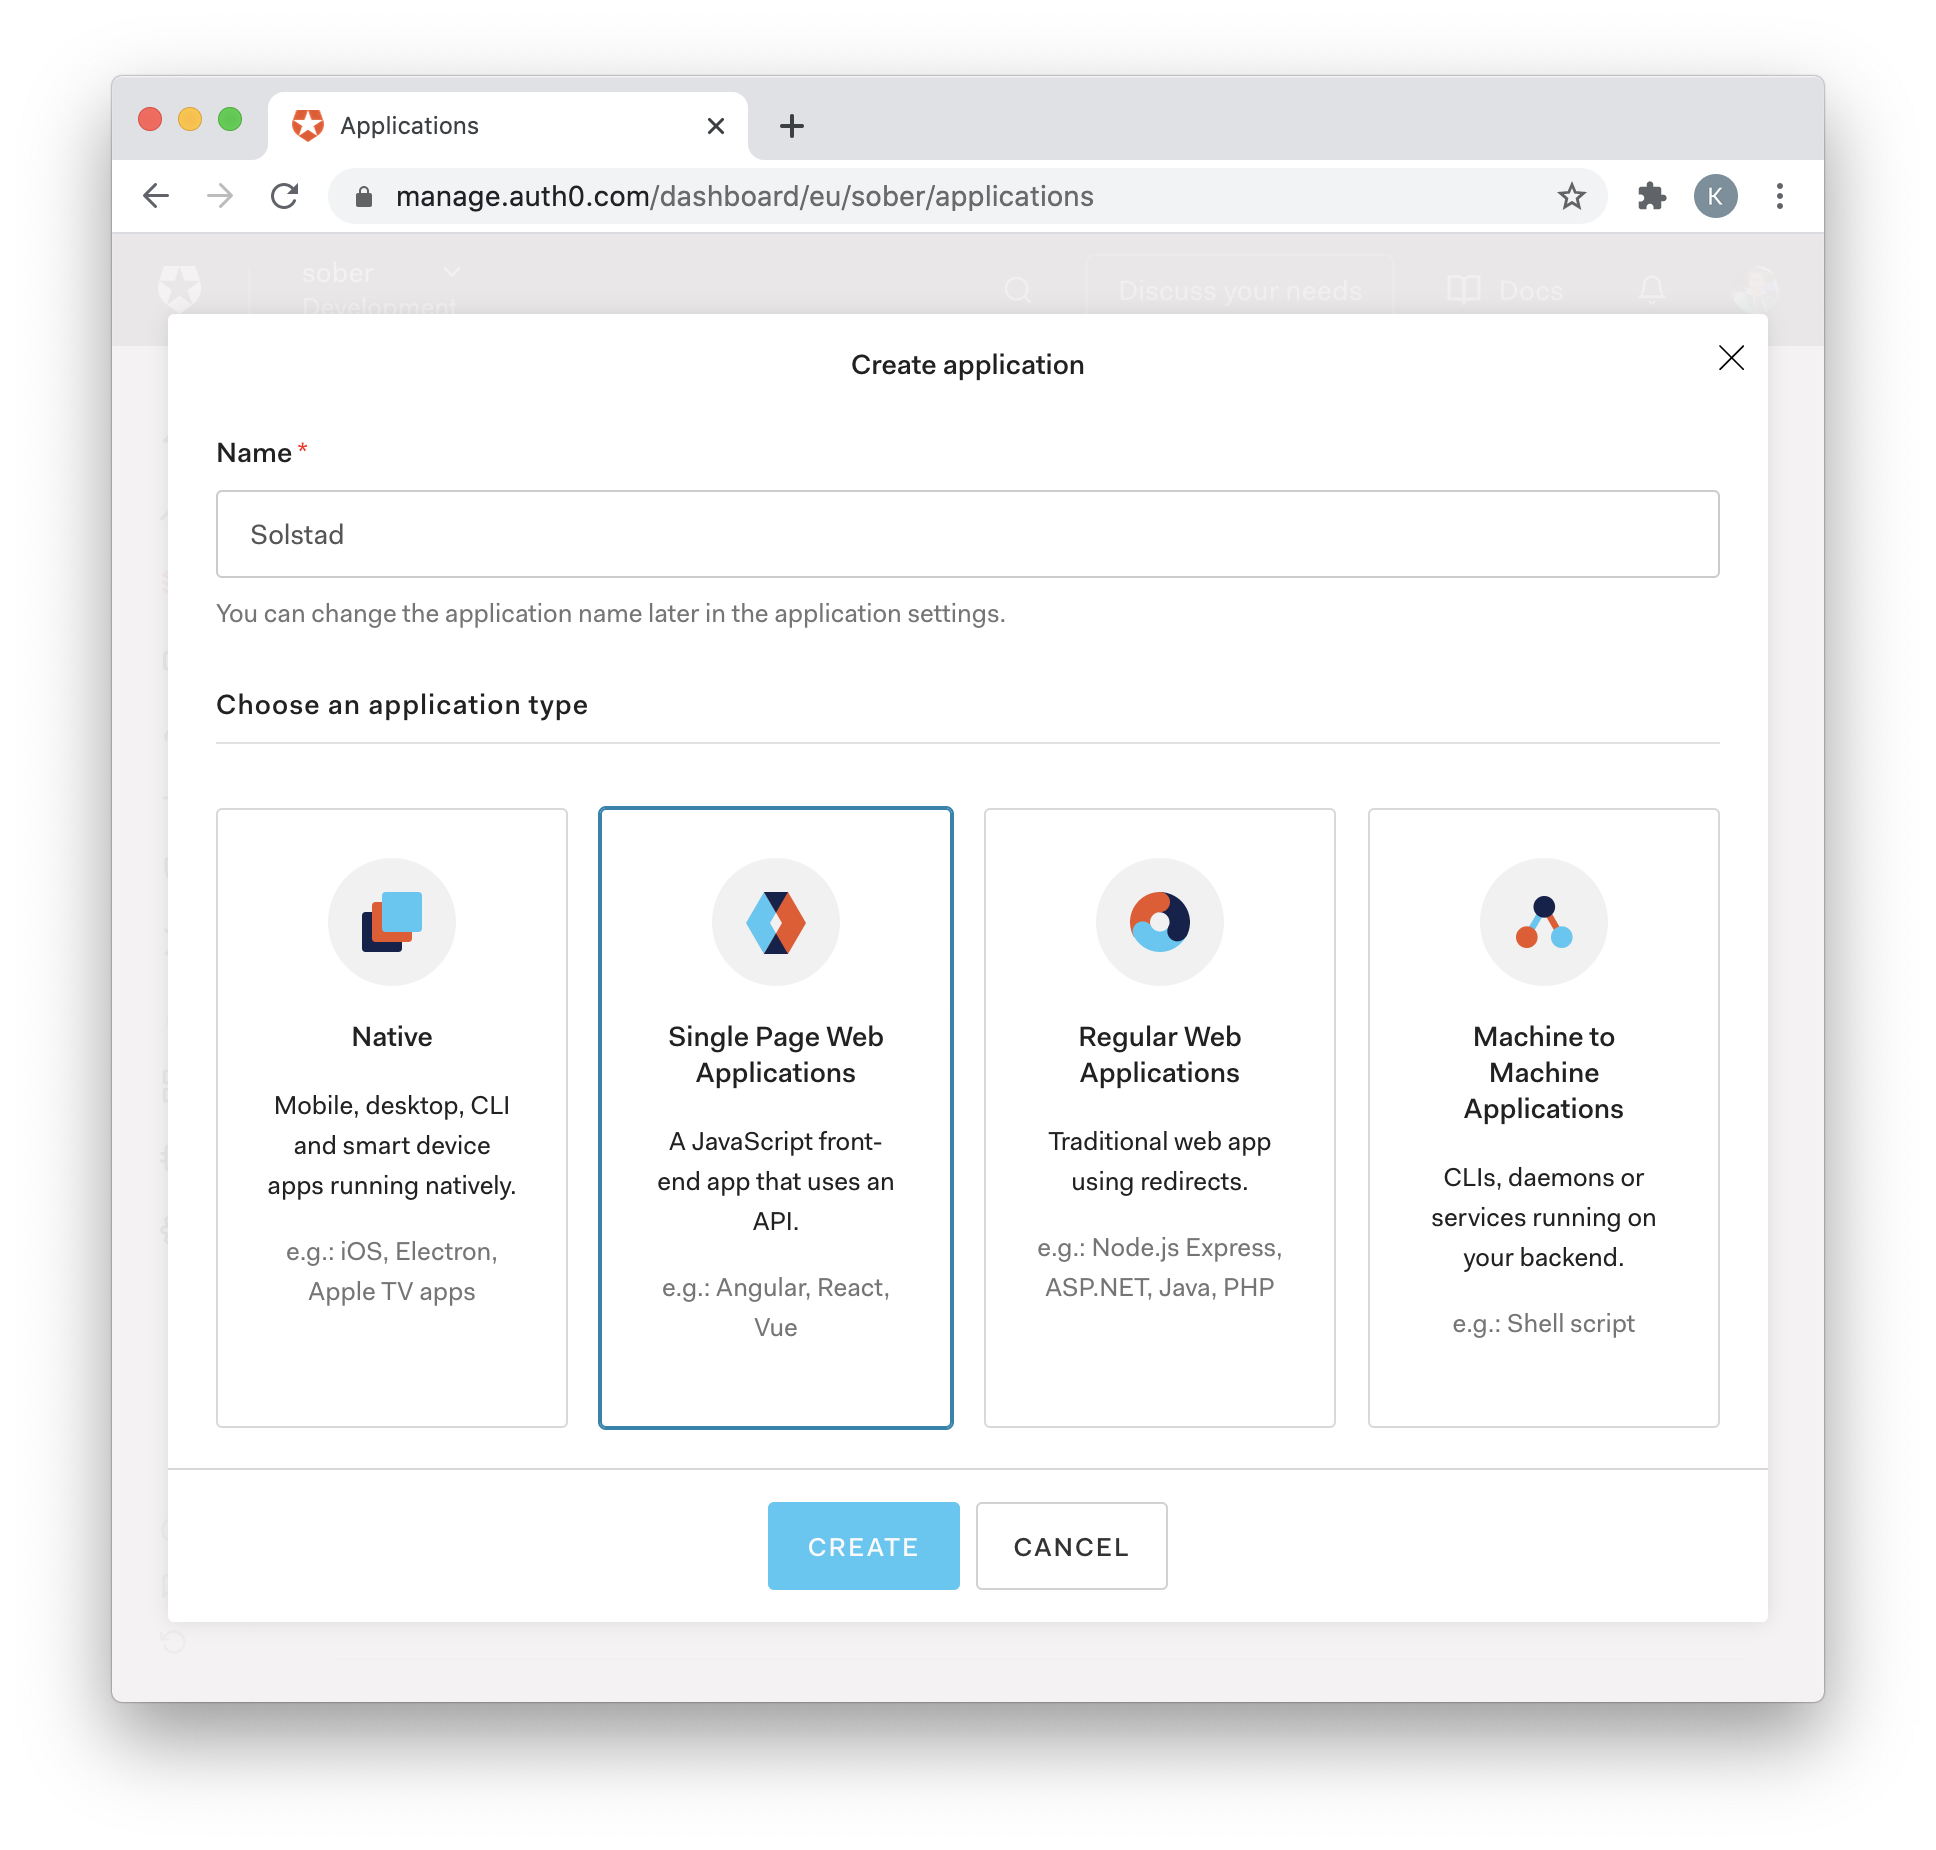
In the following example, we retrieve the authorization server's access token using the Client Credentials grant. For the entirety of this post, we will use Auth0.com as the authorization server. The first step in implementing any grant types is registering the application on the authorization server. For the client credential flow to be used, we select "Machine to Machine Applications."
We then ask for the token by sending the client id and the client secret to the token endpoint.
⋊> cat data_sign_in.json
{
  "client_id":"VNQEv6jxX5O9zOJ9g2jUoI7css7qpX60",
  "client_secret":"Q6YwgZB7CFfUf829-ZmcKDRJSYXSpGvWe2qCCn0iGvVIxGpD7ju3Zj78quJJuYiT",
  "audience":"https://soberapi.solstad.dev/",
  "grant_type":"client_credentials"
}

⋊> curl --request POST                                 \
  --url https://sober.eu.auth0.com/oauth/token      \
  --header 'content-type: application/json'         \
  --data (cat data_sign_in.json | tr -d " \t\n\r")  \
  | jq
{
  "access_token": "eyJhbGciOiJSUzI1NiIsInR5cCI6IkpXVCIsImtpZCI6Ijg1c1ZGNW5Vdl9CS2tiWF9pTUVzTSJ9.eyJpc3MiOiJodHRwczovL3NvYmVyLmV1LmF1dGgwLmNvbS8iLCJzdWIiOiJWTlFFdjZqeFg1Tzl6T0o5ZzJqVW9JN2NzczdxcFg2MEBjbGllbnRzIiwiYXVkIjoiaHR0cHM6Ly9zb2JlcmFwaS5zb2xzdGFkLmRldi8iLCJpYXQiOjE2MDE3OTYyNTUsImV4cCI6MTYwMTg4MjY1NSwiYXpwIjoiVk5RRXY2anhYNU85ek9KOWcyalVvSTdjc3M3cXBYNjAiLCJndHkiOiJjbGllbnQtY3JlZGVudGlhbHMifQ.Ltly-dvF8rKtl2ReYrYrRyG0q4f6tTyetBeCNUCNN80xFWqSlC1jjXNA4ev9ssg5PqU6QGrN1upxa8_oHSbrftTbWu9iPEkt3wITQcKvNxsxqeRvrFAHQx3JiIrFfwbxGl49xYT-4v2NLlhIZ1PvDSmjeKavu2WUHbnnPyEBP_2u3lV9H9RvjhgOuERs1U6WvOpkaw5M0dMtnP7ZEn7fiyFsaXjX4KSG4bZoAf9xRLEhY1VN1wOAEX6FIQUmJDUKIOFFfe2BoaTbpQmKwc_8OgUOgsIK9b3KNHU4_aAhMeuRl3Fpb2Vil64pggpMwCG9EP6lSuGycQ3wWoqZcJ7EQg",
  "expires_in": 86400,
  "token_type": "Bearer"
}
We use the access token to make authorized requests to the resource server. As mentioned, we should only use the Client Credentials grant type in server-to-server communication. For client-to-server communication, there are other grant types.
Authorization Code Grant Type
For web applications, the proposition is to use the Authorization Code grant type. With this flow, the frontend receives a code from the authorization server, and the backend sends it back with the client secret. IE. an authorization code is obtained through the front channel and sent through the back-channel. We trust the back-channel, but not the front-channel, for exchanging the access token because communication over the back-channel is hidden.
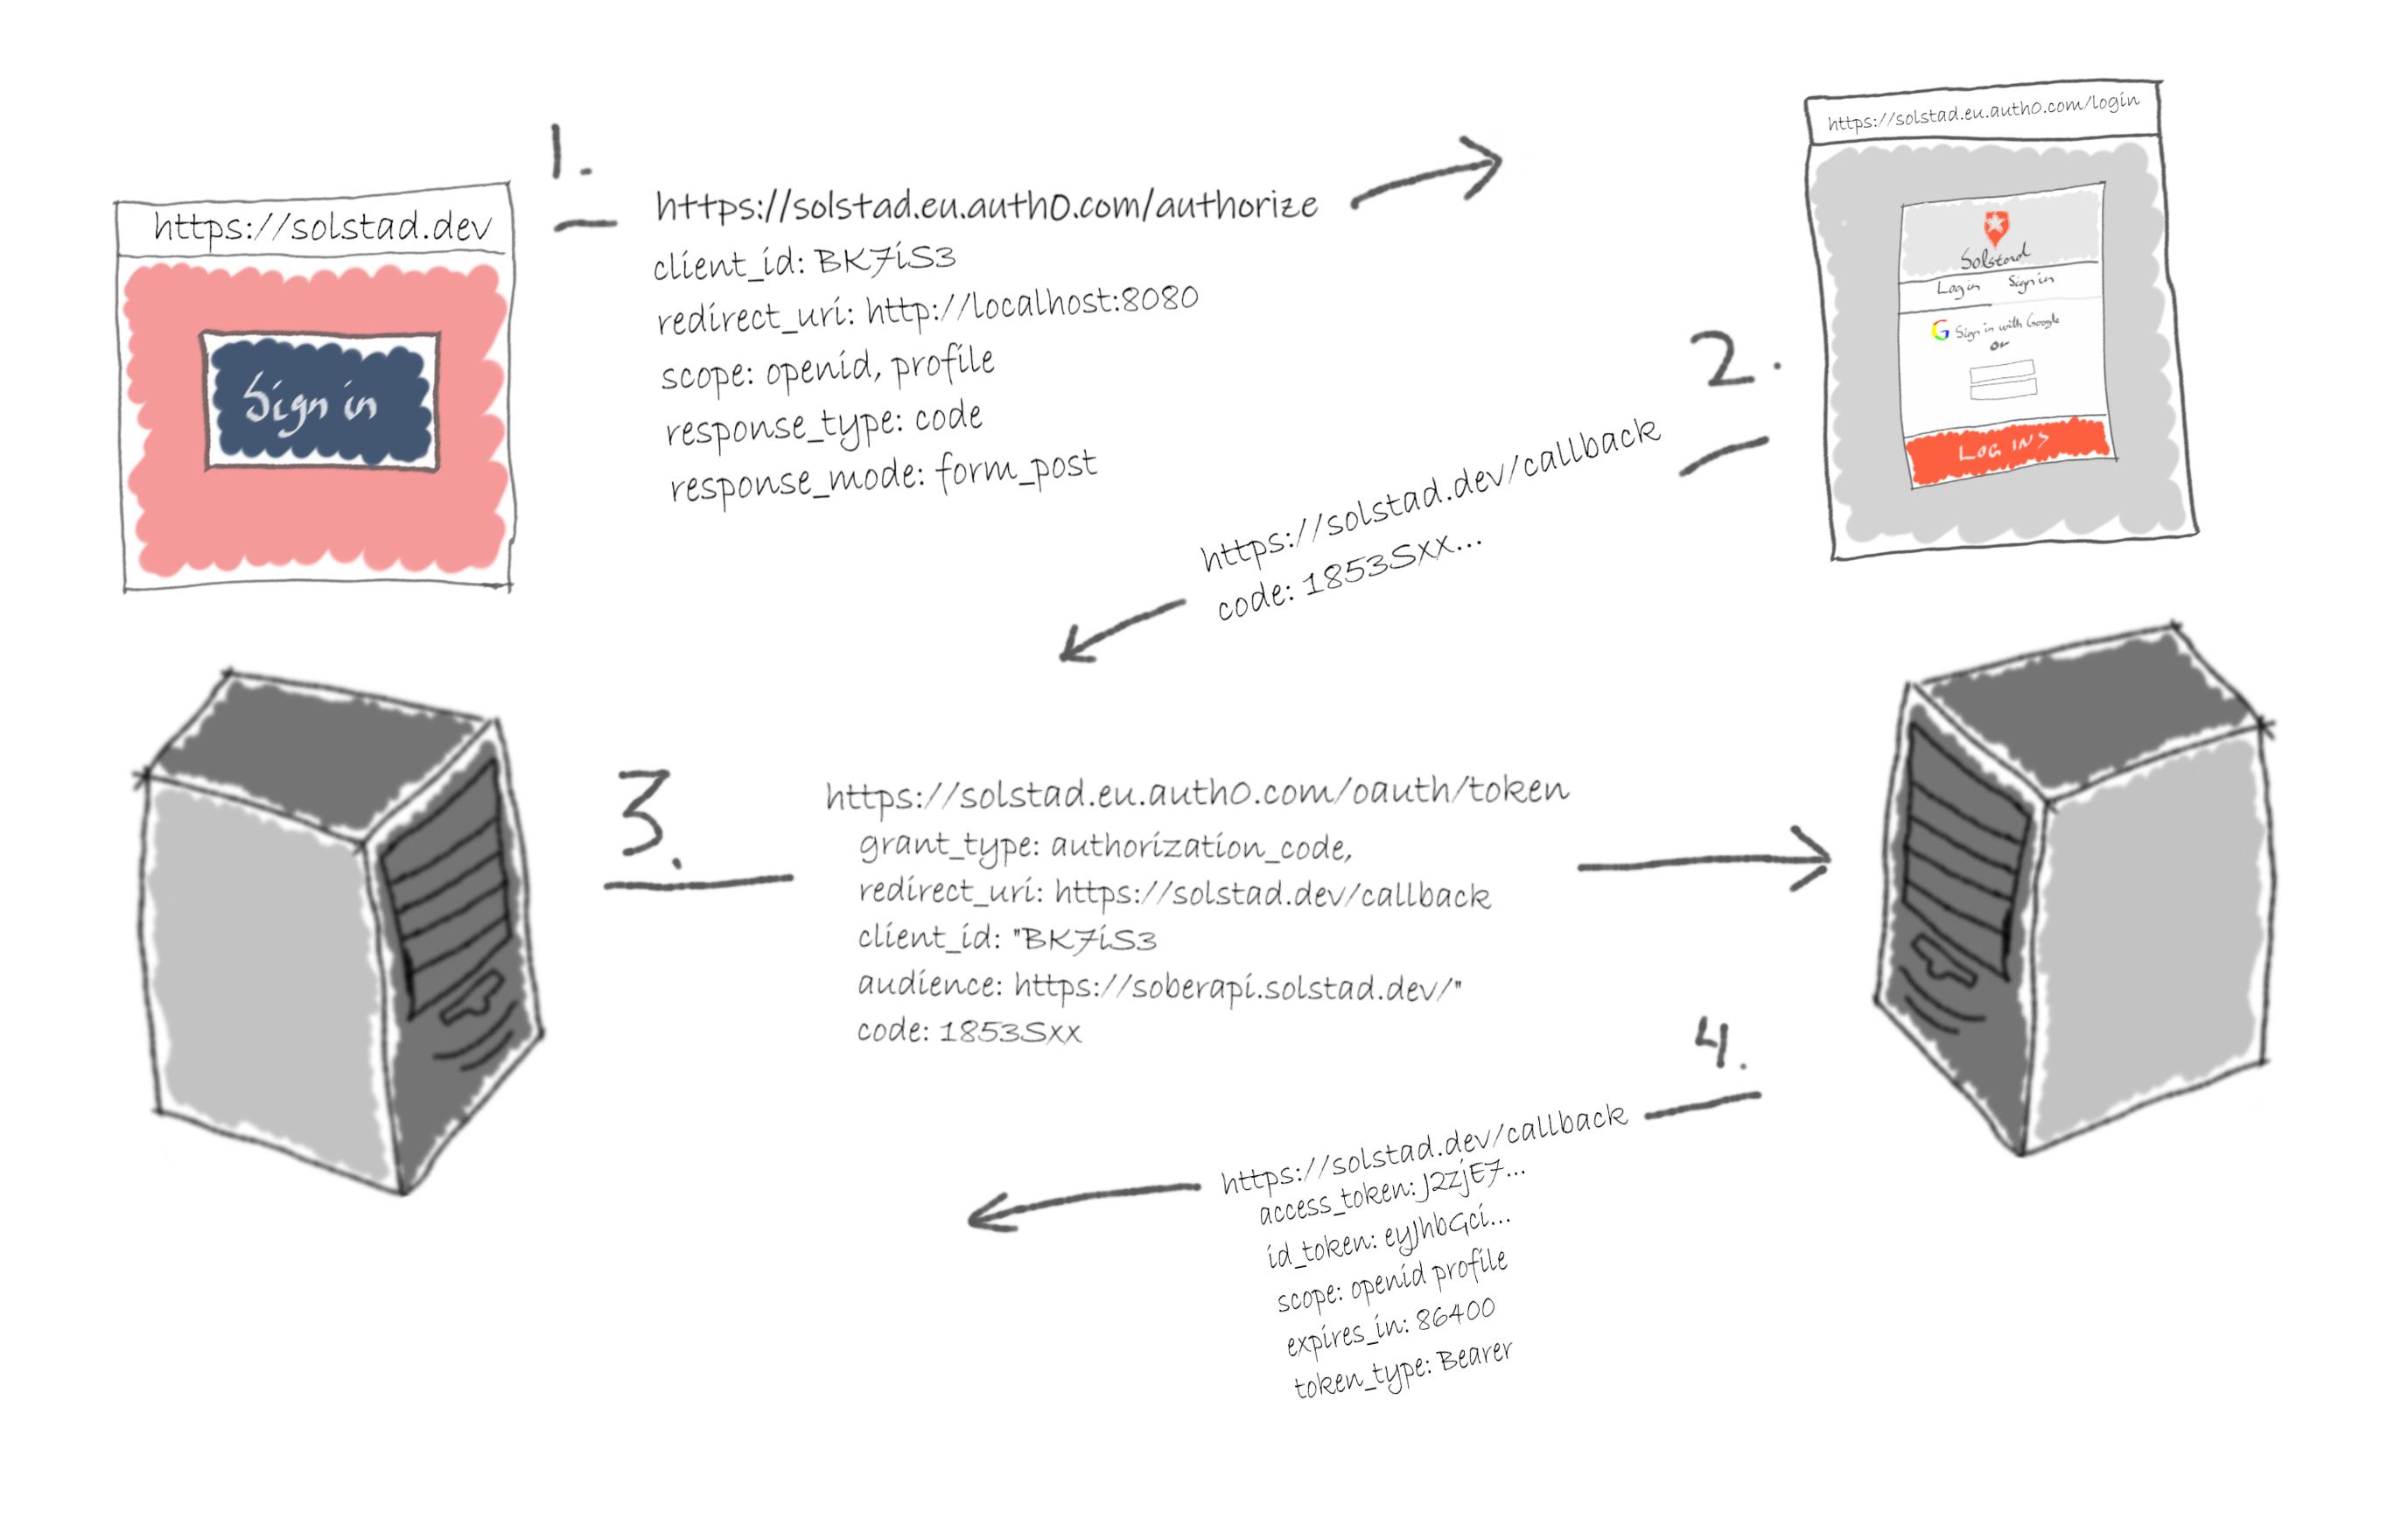
The Authorization Code grant type typically starts with the resource owner pressing the "Sign in with Google" button on the client webpage. The client redirects her to the authorize endpoint on the authorization server with a redirect URI. The authorization server lets the resource owner sign in and add scopes for the client. Subsequently, it redirects the resource owner to the redirect URI with the authorization code. Using its back-channel, the client passes the authorization code and the client secret to the authorization server and receives an access token. The resource server requires the access token when a client wants its resources.
Note: The authorization code is useless to anyone who does not know the client-secret. Intruders who unjustly gained the code is therefore not likely to obtain the access token.
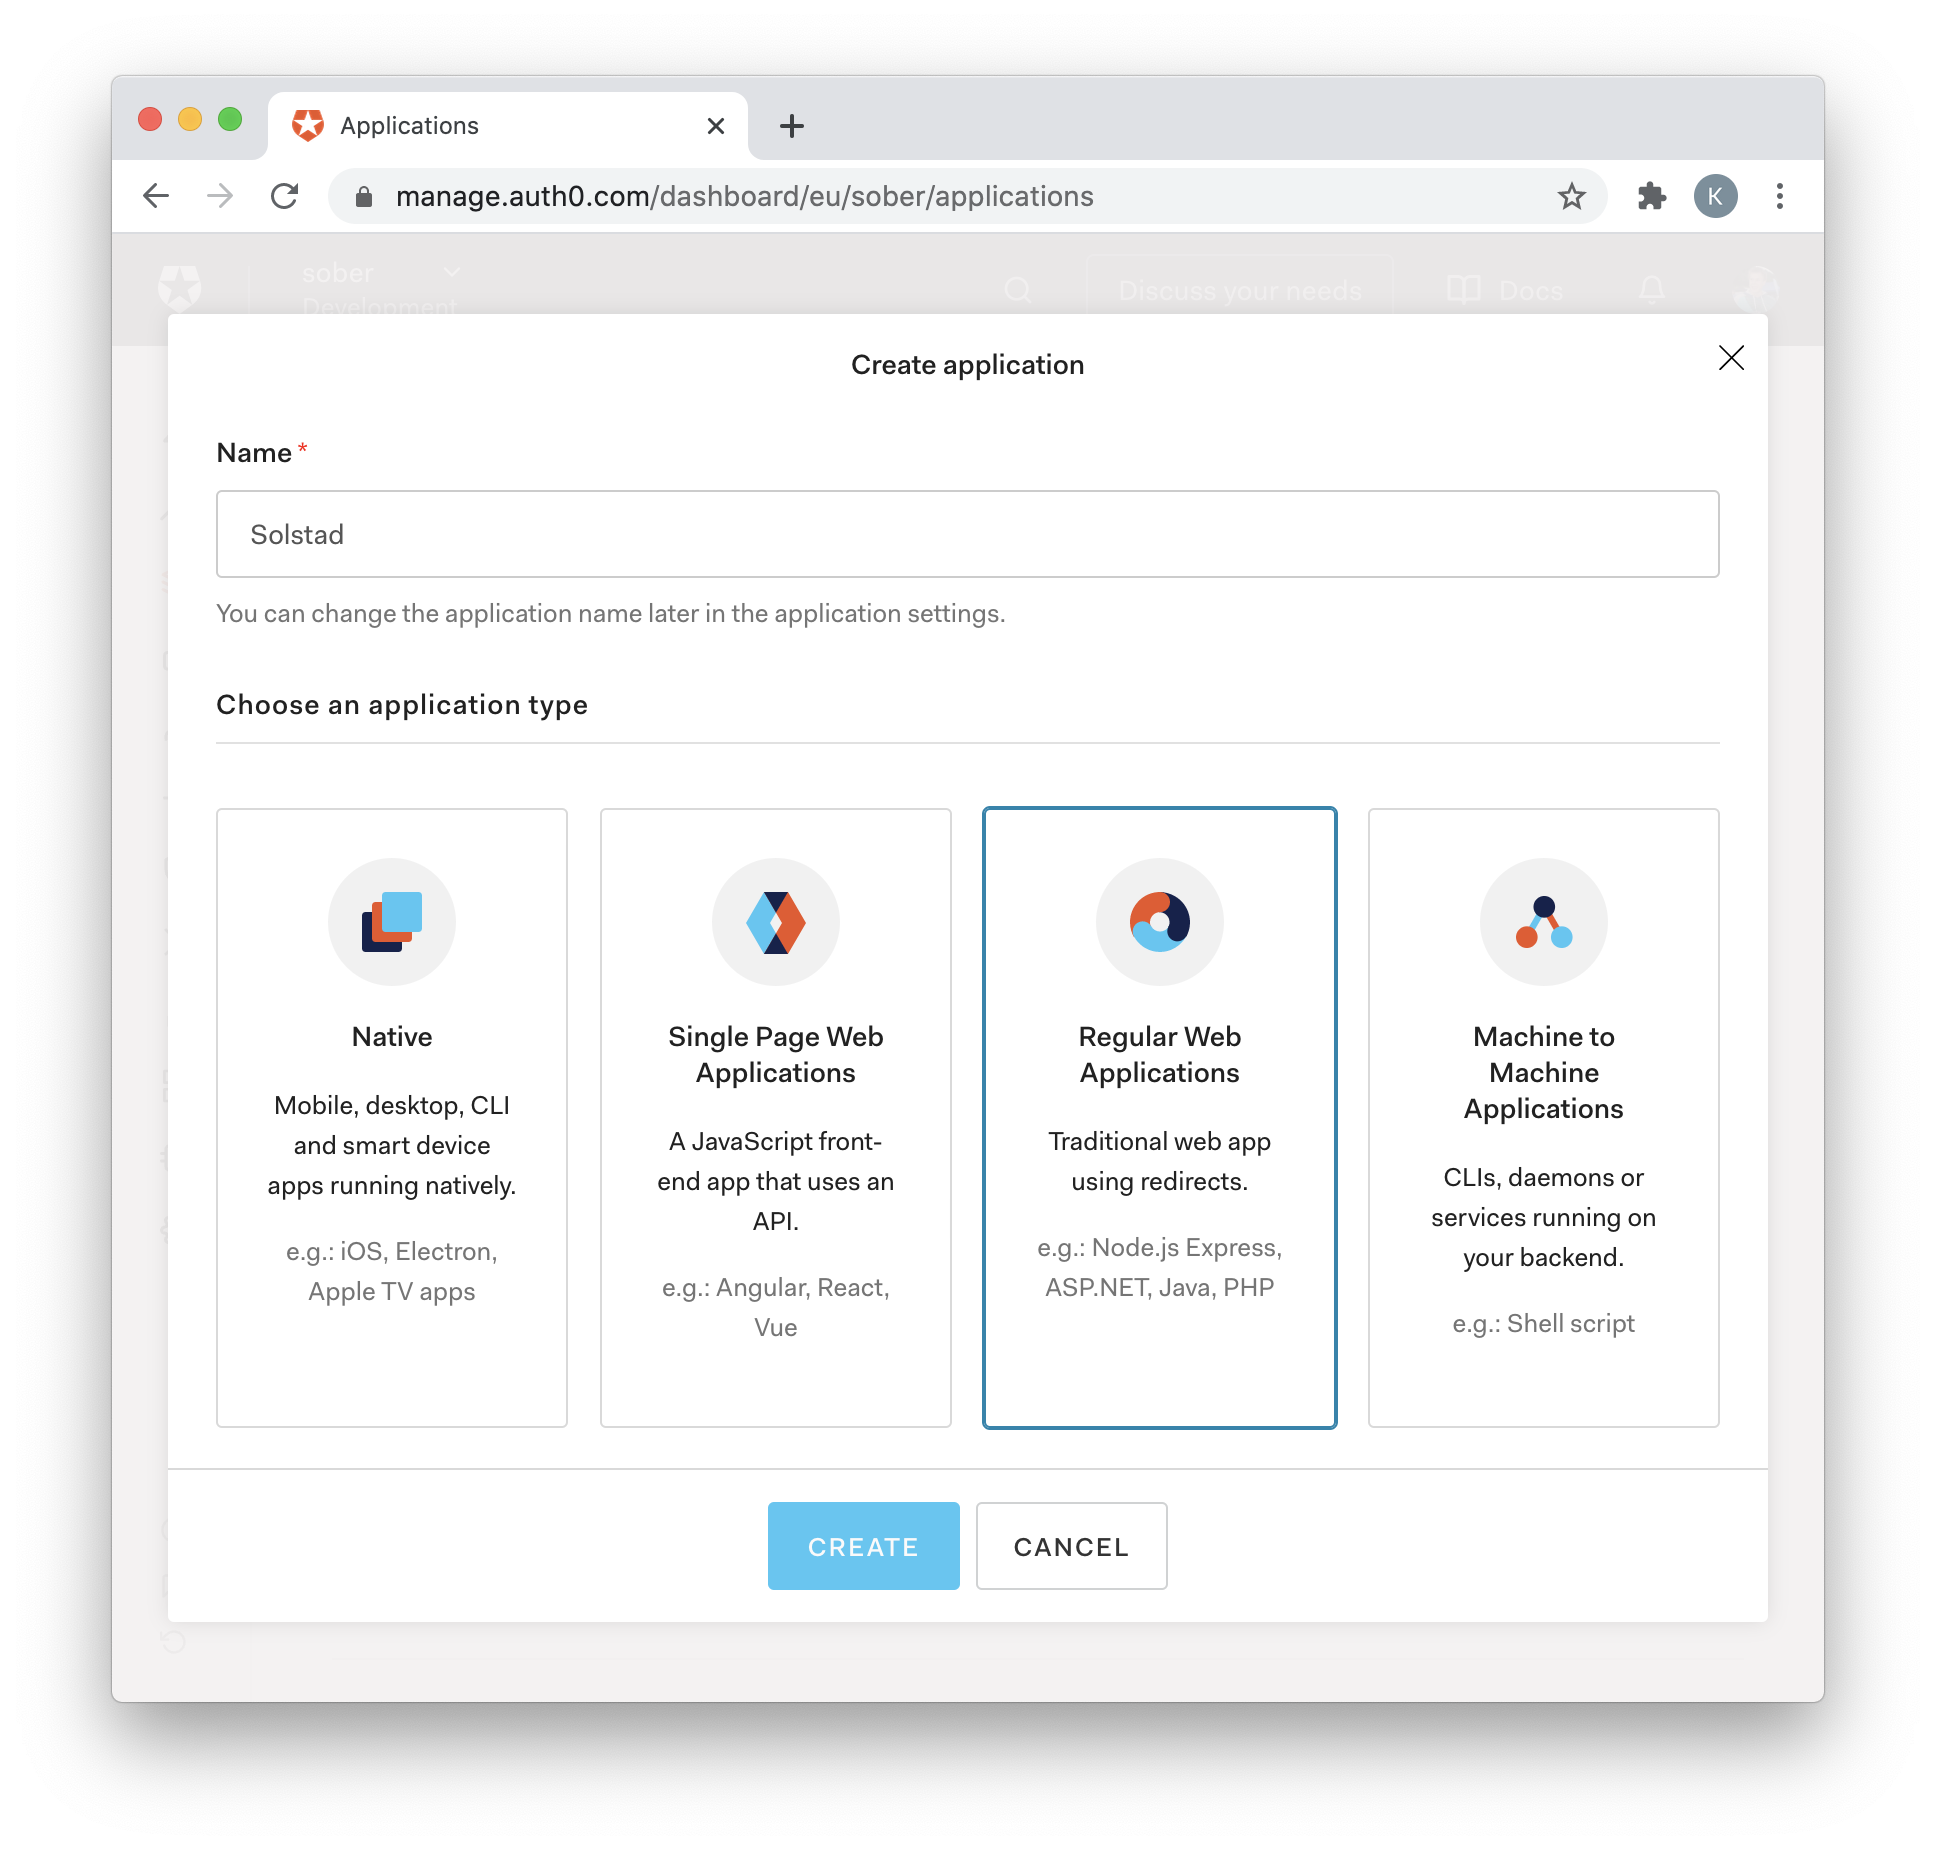
For the Authorization Code grant type to be used, "Regular Web Applications" must be selected when registering the app.
We set the allowed callback to be http://localhost:8080.
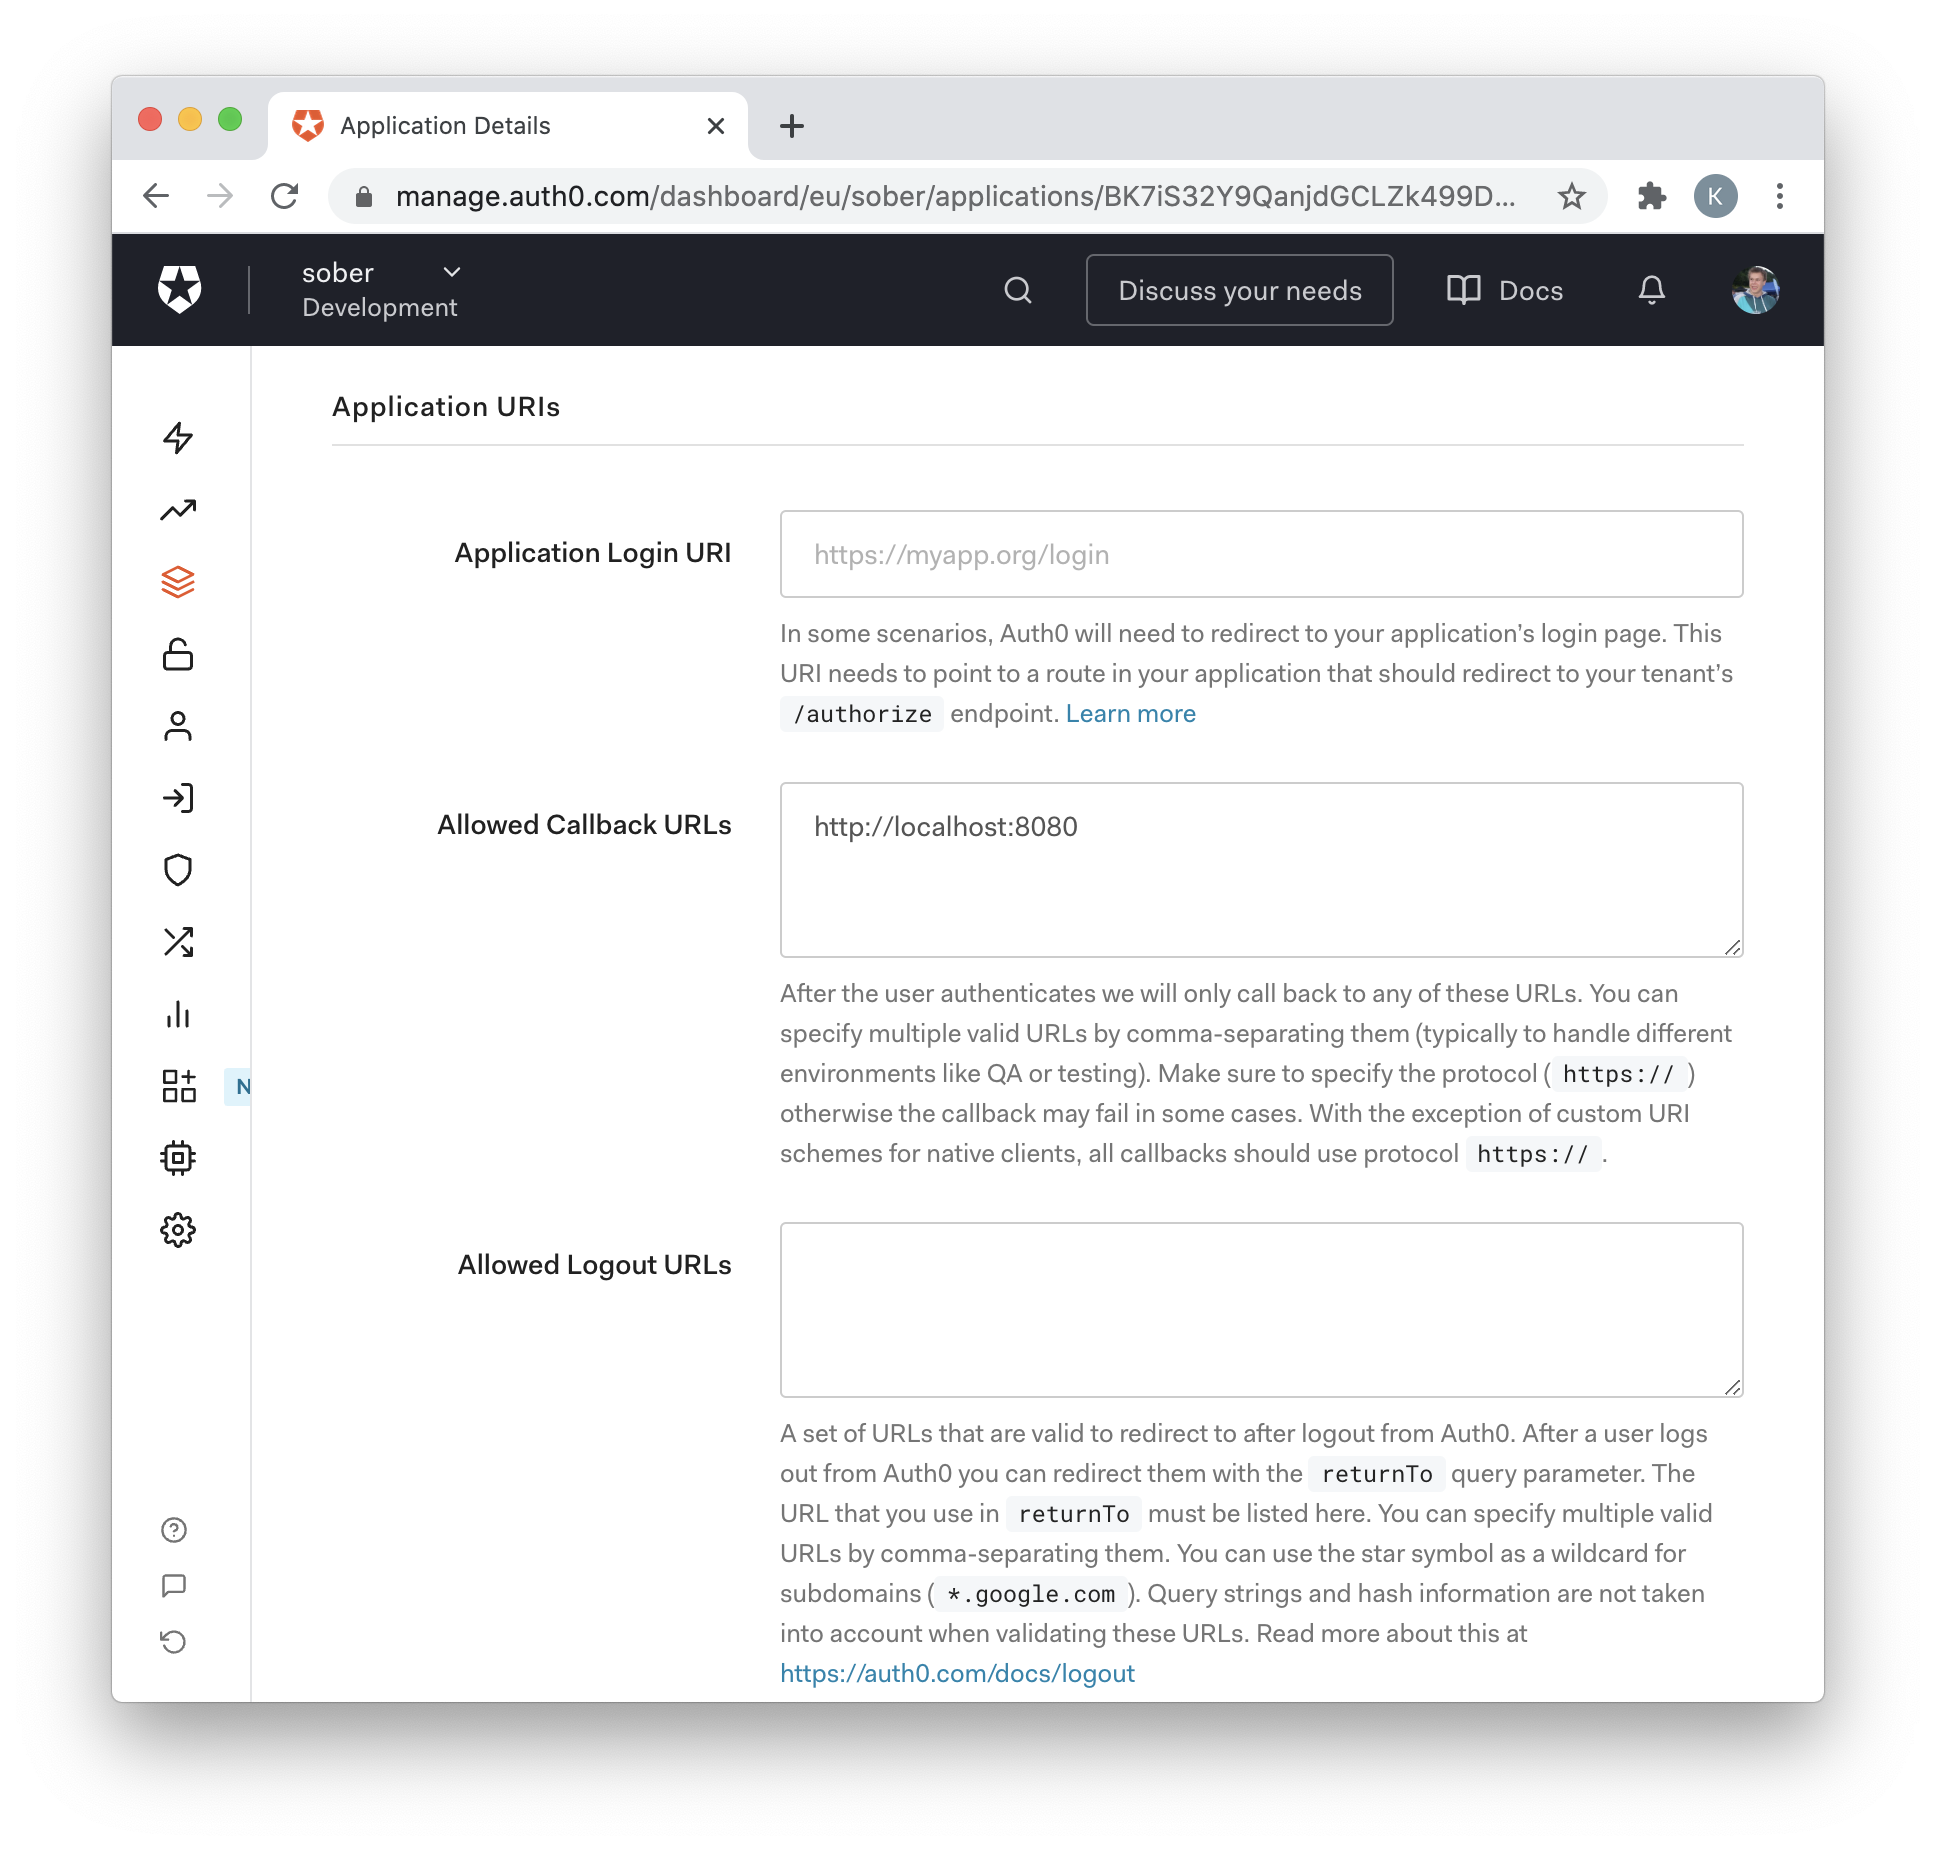
To retrieve the authorization code, we will start a web server that listens to http://localhost:8080 and prints out the post data.
// server.js
var http = require('http');

http.createServer(function (req, res) {
  let body = '';
  req.on('data', chunk => {
    body += chunk.toString();
  });
  req.on('end', () => {
    console.log(body);
    res.end('ok');
  });

}).listen(8080)
node server.js
Next, we construct a sign-in URL using the authorize endpoint. By following the link, the user enters a sign-in page, followed by a page explaining the permissions she is about to give. In our case, we will need the profile information, which requires two scopes: openid and profile. The openid scope utilizes the OIDC implementation on the authorization server to return an id token along with the access token. The profile scope populates the id token with user information. Required parameters for the authorize URL are:
- client_id: Found in the settings page for this client on auth0.com.
- redirect_uri: Where to direct the user once it is authorized.
- scope: A space-delimited list of strings that define the privileges requested by the client.
- response_type: Can be set to token or code. The latter is safer.
- response_mode: Method for presenting the response data.
⋊> open https://sober.eu.auth0.com/authorize?client_id=BK7iS32Y9QanjdGCLZk499DJ30t7jp0N&redirect_uri=http%3A%2F%2Flocalhost%3A8080&scope=openid%20profile&response_type=code&response_mode=form_post
Lastly, we exchange the authorization code for the access token. The server we previously started prints out the authorization code. The output should be something like:
code=DRnYrDZDBEHdGrhj&state=g6Fo2SA2R09xNnlEeG1VRlFsaXBMRndMblZ2U1NxbmYzOWxvZKN0aWTZIGM0OFlFRGVad24tYXpfNmNLVkFyZ1dZTmwzZ2lHSVdNo2NpZNkgQks3aVMzMlk5UWFuamRHQ0xaazQ5OURKMzB0N2pwME4
The code part is the authorization code. Exchange this and the client-secret for the access token using the token endpoint. For this grant type to be secure, this should happen from the backend.
⋊> cat data_sign_in.json
{
    "grant_type":"authorization_code",
    "redirect_uri":"http://localhost:8080",
    "client_id":"BK7iS32Y9QanjdGCLZk499DJ30t7jp0N",
    "audience":"https://soberapi.solstad.dev/",
    "code":"DRnYrDZDBEHdGrhj"
}
⋊> curl --request POST \
        --url https://sober.eu.auth0.com/oauth/token \
        --header 'content-type: application/json' \
        --data (cat data_sign_in.json | tr -d " \t\n\r") \
        | jq
{
  "access_token": "2FsL8cgBcPicvQAcicReKRpwCgZJCT-7",
  "id_token": "eyJhbGciOiJSUzI1NiIsInR5cCI6IkpXVCIsImtpZCI6Ijg1c1ZGNW5Vdl9CS2tiWF9pTUVzTSJ9.eyJnaXZlbl9uYW1lIjoiS2ltIFJ1bmUiLCJmYW1pbHlfbmFtZSI6IlNvbHN0YWQiLCJuaWNrbmFtZSI6ImtpbXJ1bmVzb2xzdGFkODkiLCJuYW1lIjoiS2ltIFJ1bmUgU29sc3RhZCIsInBpY3R1cmUiOiJodHRwczovL2xoNC5nb29nbGV1c2VyY29udGVudC5jb20vLVRZeVduLTRQX3RrL0FBQUFBQUFBQUFJL0FBQUFBQUFBQUFBL0FNWnV1Y21DU05zeE9nVGRaa05PR1BjLWQ5aG56RGNfV3cvcGhvdG8uanBnIiwibG9jYWxlIjoibm8iLCJ1cGRhdGVkX2F0IjoiMjAyMC0xMC0wNFQxMjo1ODoxOC41ODBaIiwiaXNzIjoiaHR0cHM6Ly9zb2Jlci5ldS5hdXRoMC5jb20vIiwic3ViIjoiZ29vZ2xlLW9hdXRoMnwxMTA0MzEyMTE3NzQ4MjgzMTA3MTIiLCJhdWQiOiJCSzdpUzMyWTlRYW5qZEdDTFprNDk5REozMHQ3anAwTiIsImlhdCI6MTYwMTgxNjM0OSwiZXhwIjoxNjAxODUyMzQ5fQ.YtxM30YQWgbcKzH0cphm3fXbk2j7JdN8RTTO4Q9PaL_7GUKneP4ay3WMjnLJEN3iniwWR3HM-4g3IGuYoEM175qPsPFvRZ9Er8nl_7nEQ6agzrHGGa77jyH8Sj_PuyQGSx4UF-PgN8lkub6BRldXEx5cmpgRHxfvCDVKipulangpiteVi1RnzrcXEkciuPMxaAg44cw0UKbnfhGLvDB2GZOf6JGdqXL9tH-VxKc3vYWfivQzITs4ciCnY8QhHXcqYGeFu2xevf2YORc4qSkBeR3D1-gTk4NUnizSAV9Vl4IyYaY_xQUHFzI2HmD6zqDfnsJMHStAyUaiZWowlpU3sQ",
  "scope": "openid profile",
  "expires_in": 86400,
  "token_type": "Bearer"
}
Authorization Code With PKCE
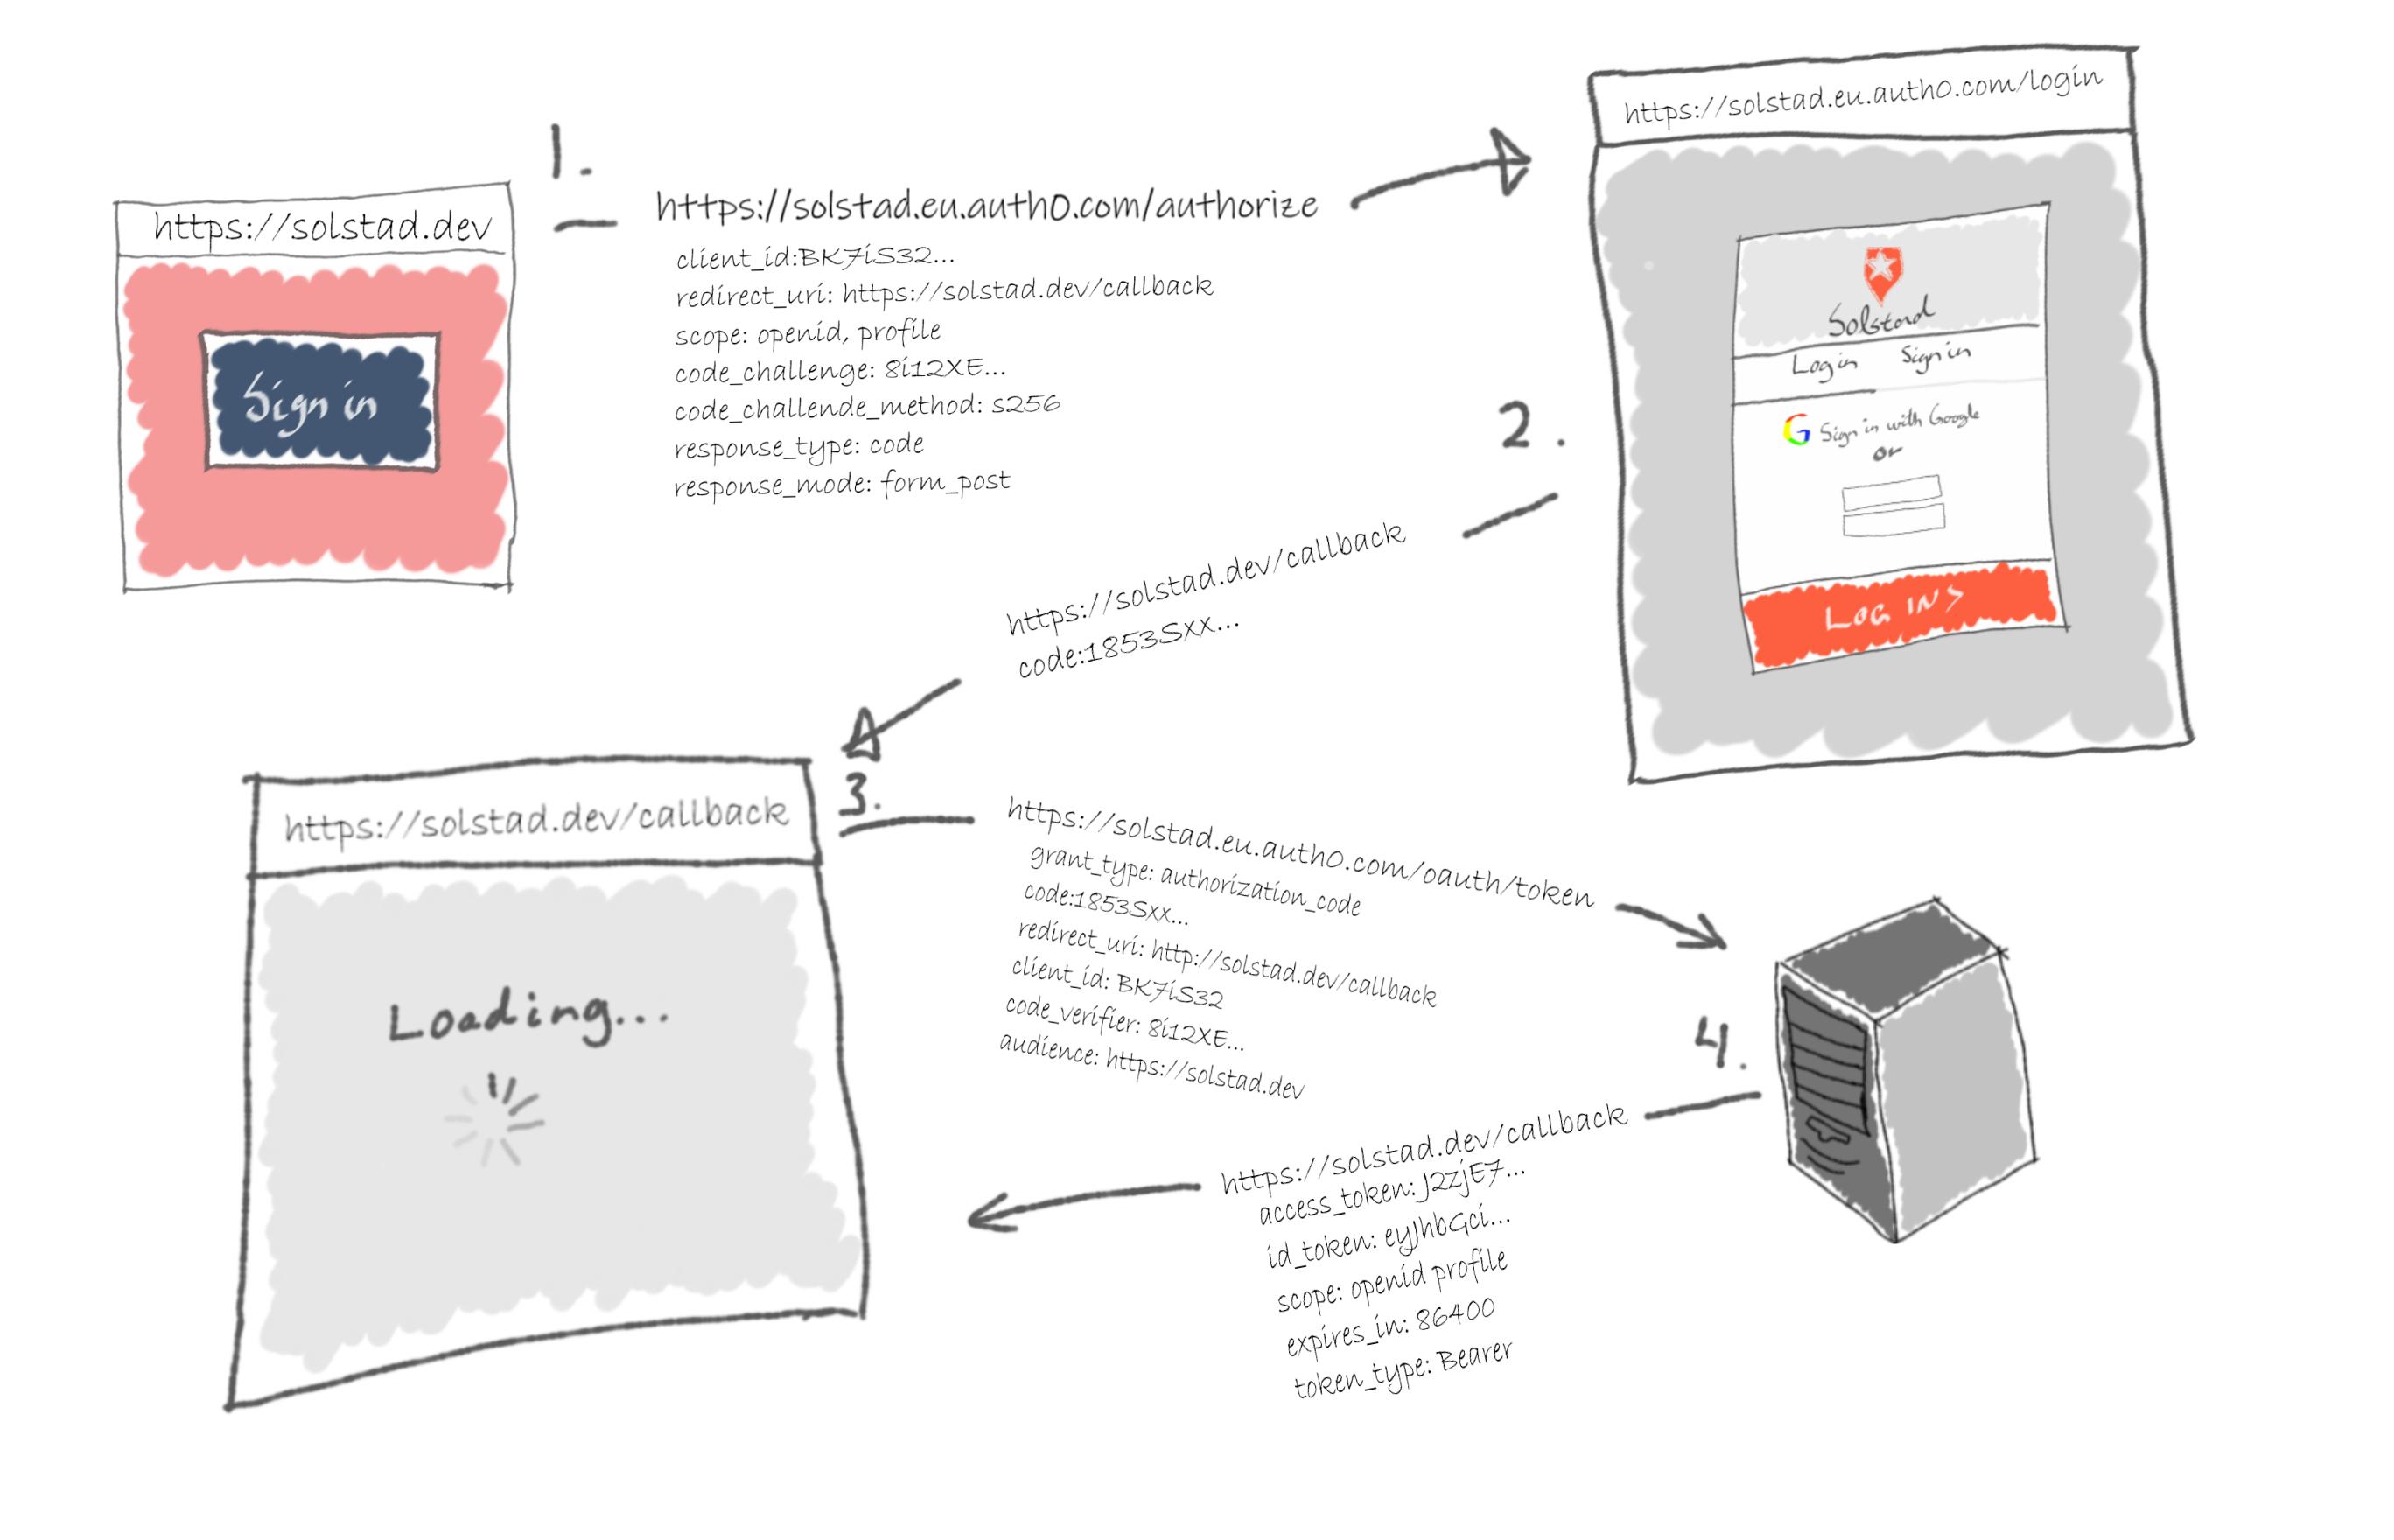
Alas, Single Page Applications (SPAs) have no backchannel through which it may exchange the authorization code for an access token. Traditionally SPAs used the Implicit flow. This grant type is similar to the Authorization Code flow but without the last step involving the client secret. The token was given to the client over the front-channel, thus removing a layer of security. The Implicit flow was standard until the IETF advised against it in their 2018 paper on best practices. They later proposed using the Proof Key for Code Exchange (PKCE) (pronounced pixie) extension to the Authorization Code flow. In the Authorization Code With PKCE flow, the client creates a code verifier and a code challenge. The code verifier is a random string, and the code challenge is the hash value of the code verifier. In the authorize-request, the client includes the code challenge. Then later, it includes the code verifier in the token exchange request.
For cases where the communication is prone to an interception, this is the recommended approach.
In this last example, we will register the application as a Single Page Application. Like the last time, set the 'Allowed Callbacks' to http://localhost:8080 and make sure the server we created in the previous example still runs.
node server.js
According to RFC7636, the code_verifier is a cryptographic random string using the characters [A-Z]/[a-z]/[0-9]/"-"/"."/"_"/"~" with a minimum length of 43 characters and a maximum of 128 characters. We need to generate such a string before we can make the code challenge.
⋊> cat /dev/urandom                      \
| LC_CTYPE=C tr -cd '[:alnum:]_.~-'   \
| fold -w 43                          \
| head -n 1
FLy2h8AP4IXo5~Od~Aeei7yJvcmwxjTs_Kv5O-e-1ah
We derive the code challenge from the code verifier. It could be equal to the code verifier, but using the hash value is recommended. We encode it as a base64url.
⋊> echo FLy2h8AP4IXo5~Od~Aeei7yJvcmwxjTs_Kv5O-e-1ah \
| shasum -a 256   \
| cut -d " " -f 1 \
| xxd -r -p       \
| base64          \
| tr / _ | tr + = | tr -d =

78ZgrApYA9Fsl9hBEZuuRK0aUUKKzUVF6v3dM7I5SPY
We include the code challenge in the sign-in URL. Also, we have to tell the authorization server what method to use for the code challenge. Because we used a hash, we must set it to S256.
⋊> open https://sober.eu.auth0.com/authorize?client_id=3YfTh7XFUa7vtNuxUkSwa5HziyquYTI3&redirect_uri=http%3A%2F%2Flocalhost%3A8080&scope=openid%20profile&code_challenge=78ZgrApYA9Fsl9hBEZuuRK0aUUKKzUVF6v3dM7I5SPY&code_challenge_method=S256&response_type=code&response_mode=form_post&nonce=2vcjjlduyzc
After sign in, the authorization server associates the code challenge with the authorization code. The authorization server sends the code to the redirect_uri where our node server listens and prints:
code=1853Sxx4h4eNKrsB&state=g6Fo2SBuZHNKcVBEMUlPQ3lHWEZiUGpSSHhIWURXc21QTkppeqN0aWTZIF9FWkpFaHprQUdPYml1ZDZ2OXNSM1Bqcm96RTMyLWlXo2NpZNkgQks3aVMzMlk5UWFuamRHQ0xaazQ5OURKMzB0N2pwME4
Lastly, to receive the ID token, we will send the authorization code and the code verifier to the authorization server's token endpoint.
⋊> cat data_sign_in.json
{
    "grant_type":"authorization_code",
    "code":"1853Sxx4h4eNKrsB",
    "redirect_uri":"http://localhost:8080",
    "client_id":"3YfTh7XFUa7vtNuxUkSwa5HziyquYTI3",
    "code_verifier":"FLy2h8AP4IXo5~Od~Aeei7yJvcmwxjTs_Kv5O-e-1ah",
    "audience":"https://soberapi.solstad.dev/"
}
⋊> curl --request POST \
        --url https://sober.eu.auth0.com/oauth/token \
        --header 'content-type: application/json' \
        --data (cat data_sign_in.json | tr -d " \t\n\r") \
        | tee token.json \
        | jq
{
  "access_token": "J2zjE7nk9_W6WG-cb_F6KHRCS3bZEqV3",
  "id_token": "eyJhbGciOiJSUzI1NiIsInR5cCI6IkpXVCIsImtpZCI6Ijg1c1ZGNW5Vdl9CS2tiWF9pTUVzTSJ9.eyJnaXZlbl9uYW1lIjoiS2ltIFJ1bmUiLCJmYW1pbHlfbmFtZSI6IlNvbHN0YWQiLCJuaWNrbmFtZSI6ImtpbXJ1bmVzb2xzdGFkODkiLCJuYW1lIjoiS2ltIFJ1bmUgU29sc3RhZCIsInBpY3R1cmUiOiJodHRwczovL2xoNC5nb29nbGV1c2VyY29udGVudC5jb20vLVRZeVduLTRQX3RrL0FBQUFBQUFBQUFJL0FBQUFBQUFBQUFBL0FNWnV1Y21DU05zeE9nVGRaa05PR1BjLWQ5aG56RGNfV3cvcGhvdG8uanBnIiwibG9jYWxlIjoibm8iLCJ1cGRhdGVkX2F0IjoiMjAyMC0wOS0yOFQxMjoyNjo0Ni43OTBaIiwiaXNzIjoiaHR0cHM6Ly9zb2Jlci5ldS5hdXRoMC5jb20vIiwic3ViIjoiZ29vZ2xlLW9hdXRoMnwxMTA0MzEyMTE3NzQ4MjgzMTA3MTIiLCJhdWQiOiJCSzdpUzMyWTlRYW5qZEdDTFprNDk5REozMHQ3anAwTiIsImlhdCI6MTYwMTI5NjE0MSwiZXhwIjoxNjAxMzMyMTQxLCJub25jZSI6IjJ2Y2pqbGR1eXpjIn0.hPKkDXd7zX8IDXBmxv7yzzmp9sdxqTTaGF3Ml5sRvkCf_89hr72B62w5sprBgz7jjF4HcvgypN9BMaxFNUM0SHjtbQKvYj5yUgZim7b7QbmyJh1Pu-YppVXhVuDwiDj0aWuRzFyxfEW39ZksYVJ3BcEhSl1ejq0-egkgiYVHMGu52enR5mr2vd3fNEjZDhDFAouL2XX1LWERxHTuSvICnhxjrmmBQ_rBs65eK9zmRGf8GM3VTPU00N7W6VE6CkA8swsV0SxSSOdPZzS8TJPIX6jHxbz9mdF31EVv43a2oEH8S3MfOf2a6yznWKP_UcAW2SgDDLb6xW1vEAZe-93QiA",
  "scope": "openid profile",
  "expires_in": 86400,
  "token_type": "Bearer"
}
ID token
The ID token is a JSON Web Token, JWT, consisting of a base64 encoded header, payload, and signature. Validation of JWT involves encoding the header and payload using the information found in the JWT and comparing it with the signature. The issuing server cannot revoke a JWT because validation does not require a link to it. Verification is explained further in RFC7519. The long sought after user information can be seen by base64 decoding the payload. Alternatively, you may use jwt.io
⋊> cat token.json              \
| jq -r .id_token           \
| awk -F. '{ print $2 }'    \
| base64 --decode           \
| sed 's/.*/&"}/g'          \
| jq
{
  "given_name": "Kim Rune",
  "family_name": "Solstad",
  "nickname": "kimrunesolstad89",
  "name": "Kim Rune Solstad",
  "picture": "https://lh4.googleusercontent.com/-TYyWn-4P_tk/AAAAAAAAAAI/AAAAAAAAAAA/AMZuucmCSNsxOgTdZkNOGPc-d9hnzDc_Ww/photo.jpg",
  "locale": "no",
  "updated_at": "2020-09-28T12:26:46.790Z",
  "iss": "https://sober.eu.auth0.com/",
  "sub": "google-oauth2|110431211774828310712",
  "aud": "BK7iS32Y9QanjdGCLZk499DJ30t7jp0N",
  "iat": 1601296141,
  "exp": 1601332141,
  "nonce": "2vcjjlduyzc"
}
Conclusion
After explaining the basics of OAuth 2.0 and OpenID Connect, we went through use cases for three different grant types, namely Client Credentials, authorization code, and PKCE. PKCE flow adds an extra layer of security compared to the deprecated implicit flow. I am, however, skeptical about the added layer of protection PKCE provides. It seems to me that anyone capable of retrieving the authorization code could get the code verifier or the access token as well. However, most SPAs communicate with some first-party API-backend that could make the OAuth 2.0 requests, thus eliminating the need for PKCE. The SPA can then communicate securely with the backend using a session cookie.